Blog

  • Using the Registry (Part 1)

    In the last post, in response to a question from a reader, I mentioned a little about how to create and use new IOCTLs. After all, the motto of this blog is “To serve well to serve forever.” Questions from readers are a great source of suggestions for new posts. I believe that like it is in any other specialty, driver development is a topic that can be broken up into many many parts. No wonder that the smallest book I know about driver development has not less than four hundred pages. So, it’s good to know what the reader’s difficulties are to know what subject to post here. Feel free to send further suggestions or questions. Some time ago, I had received an email from Fabio Dias (Fortaleza, CE – BRA), who suggested a post on how to access the Registry from a driver. Okay, let’s go.

    HKEY_LOCAL_MACHINE is User-Mode stuff

    Before going out there saying what APIs you should use to access the registry, let’s first take a look on how the registry is organized. I think the first step here is talk about opening a registry key. As in User Mode, we must have a string that informs the key path which we want to open, and thereby obtain a handle to it. Oops! Did I say I handle? Therefore, it is worth mentioning that the registry keys are also resources managed by the Object Manager. Registry keys are all stored under the “\Registry” namespace. Thus, in User Mode we use HKEY_LOCAL_MACHINE name as one of the basic divisions of the registry, whereas in Kernel Mode we use “\Registry\Machine “. Similarly to HKEY_USERS we have “\Registry\Users”. More details can be found here.

    Which is the CurrentControlSet?

    The DriverEntry routine of any Windows NT driver receives two input parameters, one being a pointer to the DRIVER_OBJECT structure, which represents the instance of our driver, and another parameter is a UNICODE_STRING containing the registry path, which indicates where our driver is registered. But how so? Can’t our driver know how it was registered in the registry? Here, in the reference is simple:

    “The registry path string pointed to by RegistryPath is of the form \Registry\Machine\System\CurrentControlSet\Services\DriverName”

    Okay, let’s take a ride on any driver and take a look at this using WinDbg. Let me open a parenthesis here to say to any new reader of this blog that I’m using a virtual machine to run the tests with a sample driver, as it is explained in this post. This allows me to do Kernel Debugging not necessarily having to use two machines. To make the driver replacement easier for each modification I do, I am using WinDbg mapping drivers, as it is explained in another post. This feature allows WinDbg to always load a new driver version in the TARGET machine without the need of having to manually replace the driver in it. Close parenthesis.

    Even before the driver be loaded, I have put a breakpoint on its DriverEntry routine. Oops! How can you put a breakpoint in a driver that has not been loaded? Oh, OK … You can do this using the bu command, as it is shown below. The breakpoints will be set whenever the driver will be loaded. In the following line, I list the breakpoints, just to… When the driver isloaded, its execution stops at my breakpoint and I use the !ustr extension, which shows the UNICODE_STRING contents, so that we can see the value of its second parameter.

    kd> bu KernelReg!DriverEntry
    kd> bl
     0 eu             0001 (0001) (KernelReg!DriverEntry)
     
    kd> g
    KD: Accessing 'Z:\Sources\DriverEntry\KernelReg\objchk_w2k_x86\i386\KernelReg.sys'
        (\??\C:\WINDOWS\system32\drivers\KernelReg.sys)
      File size 2K.
    MmLoadSystemImage: Pulled \??\C:\WINDOWS\system32\drivers\KernelReg.sys from kd
    Breakpoint 0 hit
    KernelReg!DriverEntry:
    f8d394a0 8bff            mov     edi,edi
    kd> !ustr poi(pusRegistryPath)
    String(114,114) at 82302000: \REGISTRY\MACHINE\SYSTEM\ControlSet001\Services\KernelReg

    Mas não era pra ser CurrentControlSet? Na verdade o CurrentControlSet é um link para um outro ControlSet. No caso observado acima, o CurrentControlSet está refletindo o ControlSet001, ou seja, as alterações feitas no ControlSet001 são vistas no CurrentControlSet e vice-versa. O CurrentControlSet pode refletir qualquer outro ControlSet. Algumas regras determinam quando eles mudam, como em casos de mudanças de configurações de sistema ou instalações de drivers. Para saber para onde o CurrentControlSet está apontando, dê uma olhada no valor Current que está na chave “\Registry\Machine\System\Select” como mostra a figura abaixo.

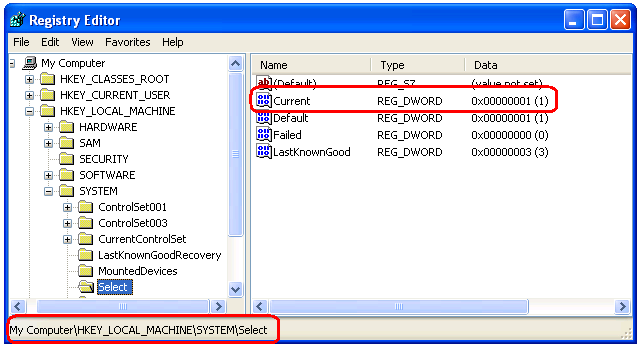
    Shouldn’t It be CurrentControlSet? Actually CurrentControlSet is a link to another ControlSet. In the case noted above, CurrentControlSet is reflecting ControlSet001, i.e., changes in the ControlSet001 are seen in CurrentControlSet and vice-versa. The CurrentControlSet can reflect any ControlSet. Some rules determine when they change, like in cases of system configuration changes or driver installation. To know where the CurrentControlSet is pointing to, take a look at the Current value, which is in “\Registry\Machine\System\Select” key, as it is shown below.
    But that’s just for the sake of curiosity. When you use CurrentControlSet as part of the key path you wish to access, the Object Manager do the translation for you and everyone lives happily ever after.

    Where is \Registry\Machine\Software?

    It may have already happened to some of you. You write a driver that should read a value in a certain “\Registry\Machine\Software” key when the driver get loaded. While you do tests with the driver, which now has its Start set to Manual(3), everything works successfuly but, when you change the driver Start to Boot(0) or System(1), it is not possible to open the same key, the driver receives STATUS_OBJECT_NAME_NOT_FOUND (0xc00000034).

    What did you mean by “name not found”? It was here right now! What happened is that the SOFTWARE key is mounted later. Thus, during the system boot it does not exist yet. To access that key you have to wait a little, perhaps using this post idea. Then everything will work like fine.

    Anything to say about HKEY_CURRENT_USER?

    Well, let’s think. Who is the Current User? The user who is making a system call, right? Thus, according to tradition, you start thinking it’s easy and when you are logged in as Paul you manually start your driver. During the call to its DriverEntry routine, the driver read settings for the user logged in, which are actually stored in the Paulo’s HKEY_CURRENT_USER. Well, that’s right up here. Yeah, it’s all wrong. For Paul point of view, the settings are right there, but the DriverEntry routine is called in system context, which incidentally is not Paul.

    This is a problem faced even in User Mode, where services that run on system account try to open the HKEY_CURRENT_USER key. One thing we must bear in mind is that “The logged user” is not a simple system information. Try to imagine a Terminal Service, there may be multiple users logged in at the same time. Even when there is only one user logged into the system, threads can be executed in other user’s context or even in the system context. Drivers do not have its own context. Portions of the driver run in system context, others in arbitrary context. Depending on the driver type and its position within the device stack , it can receive calls in user’s context. That is the case of File System drivers for example.

    Ah, OK! HKEY_CURRENT_USER will work! Er… How do I say that? No, it will not work. According to Microsoft’s reference, there is no simple translation to HKEY_CURRENT_USER, but there are routines that provide simplifications. After all this chat about context, you will still have to access the HKEY_USERS key, or rather, “\Registry\User” in the format already familiar to User Mode programmers used with HKEY_USERS. An example is: “\Registry\User\S-1-5-21-73586283-1897051121-839522115-500”. The equivalent for a system account is the “\Registry\User\.DEFAULT” key.

    OK, ok, ok! An example please

    Once again, I’m assuming you already know how to build and install a driver as it is explained in this post. The example code available for downloading at the end of this post can also be compiled on Visual Studio by using DDKBUILD, as this post explains. In this example I will show how to read two registry values ​​that are in the key which it is shown below. To make the game more fun, when the driver get executed by the first time, it will create the key and its contained values​​ when it realizes that it does not exist yet.
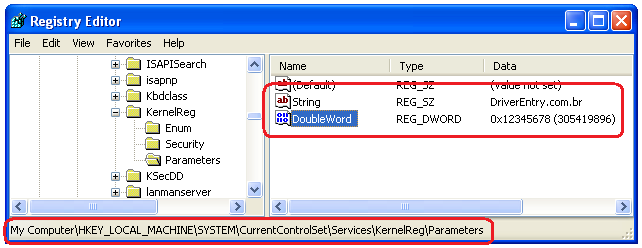
    The values will be contained in a subkey of the one you received as a parameter in the DriverEntry routine. So our basic work on coding the DriverEntry routine is precisely to create the registry full path key that contains these values​​. With this UNICODE_STRING in hand, we will take it to the reading and writing in the registry routines. Below is the DriverEntry routine code. It does not contain anything special about the registry. As always, it’s worth a read on the comments.

    /****
    ***     DriverEntry
    **
    **      Our driver's entry point.
    **      Knife in the teeth and blood in the eyes.
    */
    extern "C"
    NTSTATUS
    DriverEntry(__in PDRIVER_OBJECT  pDriverObject,
                __in PUNICODE_STRING pusRegistryPath)
    {
        UNICODE_STRING  usParameters = RTL_CONSTANT_STRING(L"\\Parameters");
        UNICODE_STRING  usFullRegPath = {0, 0, NULL};
        PWCHAR          pwzBuffer = NULL;
        NTSTATUS        nts = STATUS_SUCCESS;
     
        //-f--> Here we receive as a parameter the registry path up to
        //      our driver's key. Our parameters live in a
        //      sub-key named "Parameters". Let's build the
        //      full path by appending the sub-key name to the
        //      registry path we received as a parameter.
        __try
        {
            __try
            {
                //-f--> Set the driver's unload callback routine.
                pDriverObject->DriverUnload = OnDriverUnload;
     
                //-f--> To do this append, we will need a buffer
                //      large enough to store the original string
                //      plus the size of the sub-key. Here we allocate
                //      this buffer.
                pwzBuffer = (PWCHAR)ExAllocatePoolWithTag(PagedPool,
                                                          pusRegistryPath->Length +
                                                          usParameters.Length,
                                                          _KRN_REG_TAG);
                if (pwzBuffer == NULL)
                    ExRaiseStatus(STATUS_INSUFFICIENT_RESOURCES);
     
                //-f--> Now that we have the buffer, let's initialize the
                //      UNICODE_STRING structure for the string resulting from this append.
                RtlInitEmptyUnicodeString(&usFullRegPath,
                                          pwzBuffer,
                                          pusRegistryPath->Length +
                                          usParameters.Length);
     
                //-f--> Copy the string received as a parameter
                RtlCopyUnicodeString(&usFullRegPath,
                                     pusRegistryPath);
     
                //-f--> Concatenate the string "\Parameters"
                RtlAppendUnicodeStringToString(&usFullRegPath,
                                               &usParameters);
     
                //-f--> Using the full path, try to load the parameters
                nts = LoadParams(&usFullRegPath);
                if (!NT_SUCCESS(nts))
                {
                    //-f--> On failure, check whether the cause was the missing
                    //      sub-key in the registry. This should happen when the
                    //      driver is run for the first time. But if the failure
                    //      is a different one, then each to their own problems.
                    if (nts != STATUS_OBJECT_NAME_NOT_FOUND)
                        ExRaiseStatus(nts);
     
                    //-f--> Let's create the sub-key and write the
                    //      pre-defined values.
                    nts = CreateParams(&usFullRegPath);
                    if (!NT_SUCCESS(nts))
                        ExRaiseStatus(nts);
     
                    //-f--> Try to read the parameters again.
                    //      Okay, I know this is silly. After all, if I
                    //      just created the parameters, why would I
                    //      read them again? Well, just to illustrate.
                    nts = LoadParams(&usFullRegPath);
                    if (!NT_SUCCESS(nts))
                        ExRaiseStatus(nts);
                }
            }
            __finally
            {
                //-f--> Cleaning up the mess.
                if (pwzBuffer)
                    ExFreePool(pwzBuffer);
            }
        }
        __except(EXCEPTION_EXECUTE_HANDLER)
        {
            //-f--> Oops!
            nts = GetExceptionCode();
            ASSERT(FALSE);
        }
     
        return nts;
    }

    Let’s play with UNICODE_STRING a little more. Let’s look at the routine that writes the registry values​​. This routine does not offer anything much different than we’re used to seeing in User Mode. However, it’s like they say: “One example is worthier than a thousand articles.” Wow, that was terrible! I need to stop doing this. You must be thinking now: “Wow! What I need to read to have a driver example.”

    /****
    ***     CreateParams
    **
    **      This routine is called when the key that contains
    **      the parameters is not detected. It creates the key and the parameters
    **      with pre-defined values.
    */
    NTSTATUS
    CreateParams(__in    PUNICODE_STRING pusRegistryPath)
    {
        HANDLE              hKey = NULL;
        NTSTATUS            nts = STATUS_SUCCESS;
        OBJECT_ATTRIBUTES   ObjAttributes;
        UNICODE_STRING      usStringParam = RTL_CONSTANT_STRING(L"String");
        UNICODE_STRING      usDWordParam = RTL_CONSTANT_STRING(L"DoubleWord");
        ULONG               ulParam = 0x12345678;
        WCHAR               wzParam[] = L"DriverEntry.com.br";
     
        __try
        {
            __try
            {
                //-f--> No secret here. It's all quick and easy.
                InitializeObjectAttributes(&ObjAttributes,
                                           pusRegistryPath,
                                           OBJ_CASE_INSENSITIVE,
                                           NULL,
                                           NULL);
     
                //-f--> Create the new key and request
                //      access to set values inside it.
                nts = ZwCreateKey(&hKey,
                                  KEY_SET_VALUE,
                                  &ObjAttributes,
                                  0,
                                  NULL,
                                  REG_OPTION_NON_VOLATILE,
                                  NULL);
                if (!NT_SUCCESS(nts))
                    ExRaiseStatus(nts);
     
                //-f--> Set the numeric value
                nts = ZwSetValueKey(hKey,
                                    &usDWordParam,
                                    0,
                                    REG_DWORD,
                                    &ulParam,
                                    sizeof(ulParam));
                if (!NT_SUCCESS(nts))
                    ExRaiseStatus(nts);
     
                //-f--> Set the string value
                nts = ZwSetValueKey(hKey,
                                    &usStringParam,
                                    0,
                                    REG_SZ,
                                    &wzParam,
                                    sizeof(wzParam));
                if (!NT_SUCCESS(nts))
                    ExRaiseStatus(nts);
            }
            __finally
            {
                //-f--> Close the handle of the newly created key
                if (hKey)
                    ZwClose(hKey);
            }
        }
        __except(EXCEPTION_EXECUTE_HANDLER)
        {
            //-f--> Oops!
            nts = GetExceptionCode();
            ASSERT(FALSE);
        }
        return nts;
    }

    Finally the funny part of this story. I believe that most of the fun is concentrated in the ZwQueryValueKey routine, which performs the reading of values ​​in the registry.

    NTSTATUS 
      ZwQueryValueKey(
        IN HANDLE  KeyHandle,
        IN PUNICODE_STRING  ValueName,
        IN KEY_VALUE_INFORMATION_CLASS  KeyValueInformationClass,
        OUT PVOID  KeyValueInformation,
        IN ULONG  Length,
        OUT PULONG  ResultLength
        );

    The point that differs from the API used in User Mode to do the same task is the third parameter KEY_VALUE_INFORMATION_CLASS. An enum that tells what information we would get on a particular value in the registry. One of them asks only the name while another asks all the information and the latest all the partial information referring to the value.

    typedef enum _KEY_VALUE_INFORMATION_CLASS {
      KeyValueBasicInformation,
      KeyValueFullInformation,
      KeyValuePartialInformation
    } KEY_VALUE_INFORMATION_CLASS;

    For each enum value, a different structure is returned. Always in a single block, the structure can bring a variety of information using offsets telling where to find the data within that single memory allocation.

    In the example, I used the KeyValuePartialInformation, which I imagine to be the most used. Once again my tip is to read the comments at the excerpt below.

    /****
    ***     LoadParams
    **
    **      This routine loads the global variables with the
    **      values retrieved from the registry.
    */
    NTSTATUS
    LoadParams(__in PUNICODE_STRING pusRegistryPath)
    {
        HANDLE              hKey = NULL;
        NTSTATUS            nts = STATUS_SUCCESS;
        OBJECT_ATTRIBUTES   ObjAttributes;
        UNICODE_STRING      usStringParam = RTL_CONSTANT_STRING(L"String");
        UNICODE_STRING      usDWordParam = RTL_CONSTANT_STRING(L"DoubleWord");
        ULONG               ulBytes = 0;
        PWCHAR              pwzBuffer = NULL;
        PKEY_VALUE_PARTIAL_INFORMATION  pValueInfo = NULL;
     
        __try
        {
            __try
            {
                //-f--> Build the ObjectAttribute
                InitializeObjectAttributes(&ObjAttributes,
                                           pusRegistryPath,
                                           OBJ_CASE_INSENSITIVE,
                                           NULL,
                                           NULL);
     
                //-f--> Try to open the registry key
                nts = ZwOpenKey(&hKey,
                                GENERIC_READ,
                                &ObjAttributes);
                if (!NT_SUCCESS(nts))
                    ExRaiseStatus(nts);
     
                //-f--> Since the value has a fixed size, we can determine
                //      the buffer size needed to read the value from the
                //      registry.
                ulBytes = sizeof(KEY_VALUE_PARTIAL_INFORMATION) + 
                          sizeof(ULONG) - sizeof(UCHAR);
     
                //-F--> Allocate the buffer for the read.
                pValueInfo = (PKEY_VALUE_PARTIAL_INFORMATION)
                    ExAllocatePoolWithTag(PagedPool,
                                          ulBytes,
                                          _KRN_REG_TAG);
                if (!pValueInfo)
                    ExRaiseStatus(STATUS_INSUFFICIENT_RESOURCES);
     
                //-f--> Here we do the read.
                nts = ZwQueryValueKey(hKey,
                                      &usDWordParam,
                                      KeyValuePartialInformation,
                                      pValueInfo,
                                      ulBytes,
                                      &ulBytes);
                if (!NT_SUCCESS(nts))
                    ExRaiseStatus(nts);
     
                //-f--> We make sure we read a DWORD
                ASSERT(pValueInfo->Type == REG_DWORD);
     
                //-f--> Here we load our global variable
                //      with the value read from the registry.
                g_ulParam = *(PULONG)pValueInfo->Data;
     
                //-f--> Free the read buffer and zero the pointer.
                //      You may decide to allocate the read buffer
                //      based on the largest value you need to read,
                //      and thus use the same buffer to read all
                //      the smaller values. Here, once again, I am
                //      redoing everything to demonstrate.
                ExFreePool(pValueInfo);
                pValueInfo = NULL;
     
                //-f--> Since the string can have any size in the registry,
                //      we will offer zero bytes of read buffer so that
                //      the API tells us how much it needs for the whole buffer.
                nts = ZwQueryValueKey(hKey,
                                      &usStringParam,
                                      KeyValuePartialInformation,
                                      NULL,
                                      0,
                                      &ulBytes);
     
                //-f--> We must get one of these errors.
                ASSERT(nts == STATUS_BUFFER_OVERFLOW ||
                       nts == STATUS_BUFFER_TOO_SMALL);
     
                //-f--> Here we allocate a buffer of the size
                //      requested by the API.
                pValueInfo = (PKEY_VALUE_PARTIAL_INFORMATION)
                    ExAllocatePoolWithTag(PagedPool,
                                          ulBytes,
                                          _KRN_REG_TAG);
                if (!pValueInfo)
                    ExRaiseStatus(STATUS_INSUFFICIENT_RESOURCES);
     
                //-f--> Now we will do the read again, but this time
                //      offering a buffer of a decent size.
                nts = ZwQueryValueKey(hKey,
                                      &usStringParam,
                                      KeyValuePartialInformation,
                                      pValueInfo,
                                      ulBytes,
                                      &ulBytes);
                if (!NT_SUCCESS(nts))
                    ExRaiseStatus(nts);
     
                //-f--> We must have read a string.
                ASSERT(pValueInfo->Type == REG_SZ);
     
                //-f--> Now let's allocate the buffer that will be used to hold
                //     the string read from the registry. So we can discard the buffer
                //     used by the read. The DataLength field brings the size of the
                //     unicode string with the zero terminator. Note that this structure
                //     does not bring a UNICODE_STRING, but a WCHAR array.
                pwzBuffer = (PWCHAR)ExAllocatePoolWithTag(PagedPool,
                                                          pValueInfo->DataLength,
                                                          _KRN_REG_TAG);
                if (!pwzBuffer)
                    ExRaiseStatus(STATUS_INSUFFICIENT_RESOURCES);
     
                //-f--> After some time programming, you get quick with some
                //      things. I bet someone, and that includes myself, will one day
                //      Copy-Paste this function to use somewhere else. Here,
                //      anticipating that the registry read may happen several times,
                //      and so, if there is an allocation from a previous read, we will
                //      deallocate it.
                if (g_usParam.Length)
                    RtlFreeUnicodeString(&g_usParam);
     
                //-f--> Initialize the global string with the buffer we just allocated.
                //      Even though we set a buffer for this UNICODE_STRING, it is
                //      still empty (Length=0)
                RtlInitEmptyUnicodeString(&g_usParam,
                                          pwzBuffer,
                                          (USHORT)pValueInfo->DataLength);
     
                //-f--> Here we append the WCSTR (zero-terminated WCHAR array), read
                //      from the registry into our empty buffer. This is similar to a copy,
                //      but with an incredible advantage: not using wcslen().
                //      Never mind, it's purist paranoia. So we leave it to the API to
                //      determine the Length and MaximumLength of the UNICODE_STRING. Remember
                //      that the zero terminator is not counted as part of the UNICODE_STRING.
                RtlAppendUnicodeToString(&g_usParam,
                                         (PCWSTR)pValueInfo->Data);
            }
            __finally
            {
                //-f--> General cleanup
                if (pValueInfo)
                    ExFreePool(pValueInfo);
     
                if (hKey)
                    ZwClose(hKey);
            }
        }
        __except(EXCEPTION_EXECUTE_HANDLER)
        {
            //-f--> Oops! I did it again.
            nts = GetExceptionCode();
            ASSERT(FALSE);
        }
     
        return nts;
    }

    Phew! What a big code! In this first part of the issue I have used the APIs that most closely resemble the User Mode ones. In the next post I will bring a different way of doing the same thing we did here.

    I hope I could help.

    CYA…
    KernelReg.zip

  • Creating and Using IOCTLs

    Last week I had received the following question from a reader:

    “Is it possible for my application to send a customized IOCTL (made by myself) to a driver, and that driver being able to recognize it with no problems?”

    The short-term answer for this question is: “Yes, and good luck!”. However, what is the fun a blog has if we can not talk more about this subject and even give a simple example? You’re assumed by this you’re already aware of some basic concepts, such as compiling, installing and testing drivers; but, if you have not known this yet, do not worry, just read this post.

    The driver that used to calculate

    Let’s create a sample driver that uses the same idea my friend Heldai had already used to illustrate IOCTLs use when I was still learning how to make blue screens. At today’s example, we are making a driver that adds two numbers contained into a structure that will be received via an IOCTL.

    With no more yada yada, I think we can start by defining the structure. Like the kindergarten teacher had taught us, we are just creating a header file that is included by both, the application project and the driver project. This header file should not include any other specific one from User Mode nor Kernel Mode. That means, it cannot include files like Windows.h nor Ntddk.h. All this is aleady done, tested and able to be built in a project available for downloading at the end of the post.

    typedef struct _KERNEL_MATH_REQUEST
    {
        //-f--> I can define this structure in any way I
        //      want to.
        //      These are the two numbers to be added to it.
        ULONG   x;
        ULONG   y;
     
    } KERNEL_MATH_REQUEST, *PKERNEL_MATH_REQUEST;
     
     
    typedef struct _KERNEL_MATH_RESPONSE
    {
        //-f--> To the newbies: I know it's possible to be done it using
        //      just one structure. But I'm only doing in that
        //      way for a better illustration.
        ULONG   r;
     
    } KERNEL_MATH_RESPONSE, *PKERNEL_MATH_RESPONSE;

    Creating the IOCTL

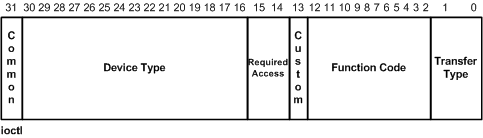
    IOCTL is more than just a number to identify the desired operation. It consists of a bit mask interpreted by Windows. This mask is defined as it is shown below. You can get more details at this macro on this link.

    To define an IOCTL, we use the CTL_CODE macro which has its parameters shown below:

    #define IOCTL_Device_Function CTL_CODE(DeviceType, Function, Method, Access)

    Let’s define our IOCTL, as it is shown below:

    //-f--> Here, we define IOCTL for our driver.
    #define IOCTL_ADD_THESE_TWO_NUMBERS \
        CTL_CODE(FILE_DEVICE_UNKNOWN, 0x800, METHOD_BUFFERED, FILE_ANY_ACCESS)
     
    //-f--> Although this driver haa the word "Sum" as part of its name,
    //      I've decided to put an IOCTL for subtraction, just as an example.
    #define IOCTL_SUBTRACT_THESE_TWO_NUMBERS \
        CTL_CODE(FILE_DEVICE_UNKNOWN, 0x801, METHOD_BUFFERED, FILE_ANY_ACCESS)

    Now, let’s take a look at every used parameter and talk a litle about it.

    FILE_DEVICE_UNKNOWN – If you take a look at the DriverEntry routine, you can notice this is the same device type used at the call for the IoCreateDevice() routine.

    /****
    ***     DriverEntry
    **
    **      That's the driver entry point.
    **      "A knife among the teeth and some blood in the eyes".
    */
    extern "C" NTSTATUS
    DriverEntry(__in PDRIVER_OBJECT     pDriverObj,
                __in PUNICODE_STRING    pusRegistryPath)
    {
        UNICODE_STRING  usDeviceName = RTL_CONSTANT_STRING(L"\\Device\\KernelSum");
        UNICODE_STRING  usSymbolicLink = RTL_CONSTANT_STRING(L"\\DosDevices\\KernelSum");
        NTSTATUS        nts;
        PDEVICE_OBJECT  pDeviceObj;
     
        //-f--> Setting the unload routine to allow the 
        //      driver to be dynamincaly unloaded.
        pDriverObj->DriverUnload = OnDriverUnload;
     
        //-f--> The Open, Cleanup e Close routines behave in the same way.
        //      So, through the minimum effort law use, they will be the same one.
        //      Besides this one, we must handle the DeviceControl which is
        //      responsible for dealing with the received IOCTLs.
        pDriverObj->MajorFunction[IRP_MJ_CREATE] =
        pDriverObj->MajorFunction[IRP_MJ_CLEANUP] =
        pDriverObj->MajorFunction[IRP_MJ_CLOSE] = OnCreateCleanupClose;
        pDriverObj->MajorFunction[IRP_MJ_DEVICE_CONTROL] = OnDeviceIoControl;
     
        //-f--> Here we are creating the driver control device. Notice that we used
        //      FILE_DEVICE_UNKNOWN as the device type. This same one is used
        //      at the CTL_CODE macro. See: IoCtl.h
        nts = IoCreateDevice(pDriverObj,
                             0,
                             &usDeviceName,
                             FILE_DEVICE_UNKNOWN,
                             0,
                             FALSE,
                             &pDeviceObj);
     
        //-f--> Is everything fine so far? OK...
        if (!NT_SUCCESS(nts))
        {
            ASSERT(FALSE);
            return nts;
        }
     
        //-f--> Here we are creating a symbolic link so that, the application
        //      can get a handle for the control device.
        nts = IoCreateSymbolicLink(&usSymbolicLink,
                                   &usDeviceName);
     
        //-f--> Is it all right?
        if (!NT_SUCCESS(nts))
        {
            //-f--> Oops... I think my pant is sort of wet...
            IoDeleteDevice(pDeviceObj);
     
            ASSERT(FALSE);
            return nts;
        }
     
        //-f--> Great, that is it!
        return STATUS_SUCCESS;
    }

    The secong CTL_CODE parameter Function, receives a 0x800 number, since numbers below this one are reserved for Microsoft.

    METHOD_BUFFERED – indicates to the I/O Manager the driver will receive an input buffer copy passed to DeviceIoControl function. I/O Manager allocates a system buffer, which means in kernel space, that it is big enough to fit both the input and output data. When the DeviceIoControl function is called, the I/O Manager allocates the system buffer and copies the input buffer inside it. The driver receives the IRP, gets the input parameters, processes them and writes the output data at the same system buffer. When the IRP is completed, the I/O Manager copies the output data from the system buffer to the output buffer provided by the application.

    Besides the Buffered method, there are still the Direct I/O and Neither methods. For our currently example, the Buffered method is great. I am owing a post to you that talks about how to use every one of the other methods.

    FILE_ANY_ACCESS – That indicates the handle doesn’t need to be opened with any special kind of access to allow the IOCTL to be excetuted.

    From the application to the driver

    To send an IOCTL to the driver, you need to use the DeviceIoControl function as it is shown at the example below. This is a very simple program that shows its use.

    /****
    ***     main
    **
    **      I hope all of you have already known that this is the entry
    **      point of the application. Otherwise you might be
    **      precipitated on reading a Windows driver blog.
    **
    */
    int __cdecl main(int argc, CHAR* argv[])
    {
        HANDLE                  hDevice;
        DWORD                   dwError = ERROR_SUCCESS,
                                dwBytes;
        KERNEL_MATH_REQUEST     Request;
        KERNEL_MATH_RESPONSE    Response;
     
        printf("Opening \\\\.\\KernelSum device...\n");
     
        //-f--> Here, we are opening a handle for our device, which
        //      has been created by the driver. Remember that our
        //      sample driver must be installed and started
        //      so that the call below can work properly.
        hDevice = CreateFile("\\\\.\\KernelSum",
                             GENERIC_ALL,
                             0,
                             NULL,
                             OPEN_EXISTING,
                             0,
                             NULL);
     
        //-f--> It Verifies whether the open was opened.
        if (hDevice == INVALID_HANDLE_VALUE)
        {
            printf("Error #%d opening device...\n",
                   (dwError = GetLastError()));
            return dwError;
        }
     
        //-f--> I got lazy and I put the values fixed at the sample code.
        Request.x = 3;
        Request.y = 2;
     
        printf("Calling DeviceIoControl...\n");
     
        //-f--> It sends the IOCTL
        if (!DeviceIoControl(hDevice,
                             IOCTL_SOMA_QUE_EU_TO_MANDANDO,
                             &Request,
                             sizeof(KERNEL_MATH_REQUEST),
                             &Response,
                             sizeof(KERNEL_MATH_RESPONSE),
                             &dwBytes,
                             NULL))
        {
            //-f--> Oops...
            printf("Error #%d calling DeviceIoControl...\n",
                   (dwError = GetLastError()));
     
            CloseHandle(hDevice);
            return dwError;
        }
     
        //-f--> Show the results.
        printf("%d + %d = %d\n",
               Request.x,
               Request.y,
               Response.r);
     
        printf("Closing device...\n");
        //-f--> Close the handle.
        CloseHandle(hDevice);
        return 0;
    }

    Note that there is no strong relation between the IOCTL and the used input or output buffers, but we must be attentive to the buffer sizes when the driver makes use of them. Nobody wants to corrupt the kernel heap allocations or throwing off exceptions in kernel mode, do they?

    You can see how data are processed by the driver when receiving the IRP_MJ_DEVICE_CONTROL. Reading the comments is a good idea; they are a part of the explanation. Wow, that sentence representing my laziness got nice!! Basically, it is the same to say: “Oh my! Seriously, besides preparing this example, you still want me to duplicate all the comment information? I don’t think so!”

    /****
    ***     OnDeviceIoControl
    **
    **      This routine is called when an application
    **      sends an IOCTL to our driver via DeviceIoControl.
    */
    NTSTATUS
    OnDeviceIoControl(__in PDEVICE_OBJECT   pDeviceObj,
                      __in PIRP             pIrp)
    {
        PIO_STACK_LOCATION      pStack;
        NTSTATUS                nts;
        PKERNEL_MATH_REQUEST    pRequest;
        PKERNEL_MATH_RESPONSE   pResponse;
     
        //-f--> We get the parameters referring to our driver.
        pStack = IoGetCurrentIrpStackLocation(pIrp);
     
        switch(pStack->Parameters.DeviceIoControl.IoControlCode)
        {
        case IOCTL_SUM_THIS_TWO_NUMBERS:
        case IOCTL_SUBTRACT_THIS_TWO_NUMBERS:
     
            //-f--> Let's do the checking about the input
            //      and output buffer sizes.
            if (pStack->Parameters.DeviceIoControl.InputBufferLength !=
                sizeof(KERNEL_MATH_REQUEST) ||
                pStack->Parameters.DeviceIoControl.OutputBufferLength !=
                sizeof(KERNEL_MATH_RESPONSE))
            {
                nts = STATUS_INVALID_BUFFER_SIZE;
                pIrp->IoStatus.Information = 0;
                break;
            }
     
            //-f--> The safe then sorry.
            ASSERT(pIrp->AssociatedIrp.SystemBuffer != NULL);
     
            //-f--> Making use of METHOD_BUFFERED, the system allocates only one
            //      buffer to transport either the input and output data. The buffer
            //      size is the same as the biggest one of them. Thus, be careful having read
            //      all the input data before starting to write the output to the buffer.
            pRequest = (PKERNEL_MATH_REQUEST)pIrp->AssociatedIrp.SystemBuffer;
            pResponse = (PKERNEL_MATH_RESPONSE)pIrp->AssociatedIrp.SystemBuffer;
     
            //-f--> It does the math and indicates its success.
            if (pStack->Parameters.DeviceIoControl.IoControlCode == IOCTL_SOMA_QUE_EU_TO_MANDANDO)
                pResponse->r = pRequest->x + pRequest->y;
            else
                pResponse->r = pRequest->x - pRequest->y;
     
            nts = STATUS_SUCCESS;
     
            //-f--> It informs the I/O Manager how many bytes have to be transferred 
            //      back to the application.
            pIrp->IoStatus.Information = sizeof(KERNEL_MATH_RESPONSE);
            break;
     
        default:
            //-f--> Oops... We have received an unknown IOCTL.
            nts = STATUS_INVALID_DEVICE_REQUEST;
            pIrp->IoStatus.Information = 0;
        }
     
        //-f--> It copies the final IRP status and completes it.
        pIrp->IoStatus.Status = nts;
        IoCompleteRequest(pIrp, IO_NO_INCREMENT);
     
        //-f--> NOTE: Remember that we cannot touch the IRP after completing it;
        //      so, don't be the "smart ass" changing the line below to return the
        //      IRP status taking the value from the IRP. (return pIrp->IoStatus.Status;)
        return nts;
    }

    Building in this or in that way

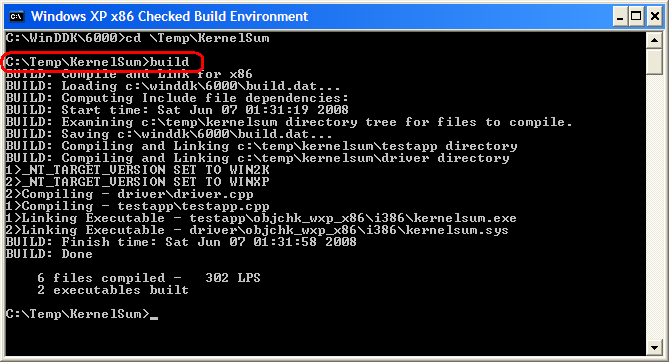
    The sample project available for downloading at the end of this post can be compiled in two ways. One way is using the standard way to compile drivers offered by WDK. Briefly you go through “Start->All Programs->Windows Driver Kits->WDK 6000->Build Environments->Windows XP->Windows XP x86 Checked Build Environment”. This should open a console prompt, as it is shown below. Then, just go to the directory where you download these Internet sources and to the project root directory. There you need to call Build.exe and it is done.

    The other way to compile the entire project allows you to build it using Visual Studio 2008, which has been the environment I have used to compose this project. However, to build the project by using the IDE you have to use DDKBUILD, as it is shown in this post referring to it.

    While I was out, I had received another reader’s question who wanted to know how to read or write into the registry using a driver. In the next post, I’ll talk about that and other details regarding to the registry from a driver’s point of view.

    CYA!

    KernelSum.zip

  • Getting up-to-date

    Once more I have not posted any for a long time. Now you might be thinking: “Here he comes with that chatter he has no time, everything is difficult and God does not like the kernel developers and so on.” Well, I am skipping this part of apologies and just saying what I have been doing during that time.

    Windows Driver Training

    Well, let me see where I have stopped. My last post was during the period when I was teaching a driver development course for a private class. The course was given in five Saturdays of eight hours each. Needless to say, it took me a while. Okay, okay, okay, no excuses.

    Forth C/C++ Programmers’ Meeting

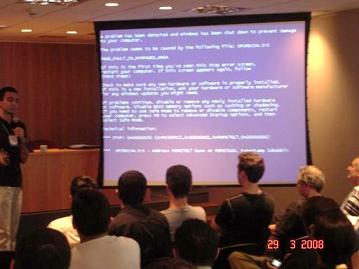
    On next Saturday following the end of the course, I took a tour around this event. They left the door open and I could get through for a peek and talk a little about Windows drivers’ architecture and development using C language. I confess that the invitation to participate in this event was a surprise to me. I’m not a great C++ programmer but I use the C language with “classes”, as just my friend Strauss gets used to say. I can say it was very interesting to participate in this event with a very high technical level. I had an opportunity to realize the way the language may be used in different scenarios. The slides from my talk are available at this link.

    Going back to Boston

    It seems that things only happen on Saturdays. Anyway, on the next Saturday following the meeting, I embarked to Boston on a trip taking about one month. The last time I had been there was due to the OSR training described in this post. This time, it was about an IBM integration program. I could personally meet the people I work with and previously had only met through Web Conferences. Again, it was very interesting and I tried to enjoy it mostly. We were two Brazilians and one Indian. I missed our Brazilian coffee a lot. In this photo, there are below, from left to right, David E. Jones (Manager), Scott D. Hankin (Documentation), William C. Oliveira (Linux), William H. Taber (Linux), Mridula Muppana (Testing), Paul Ganshirt (Windows), Niraj Kumar (AIX), Kaveesh Mishra (Windows), Fernando Roberto (Windows) and Richard Kissel (AIX and Linux). This is just one part of the whole MVFS team.

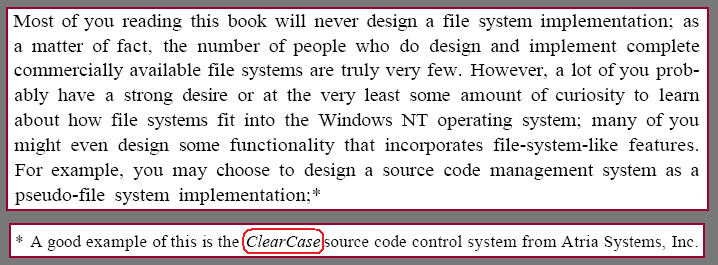
    Don’t you know what MVFS is? It is a File System that is part of a product called ClearCase. Don’t you know ClearCase? Well, beyond Wikipedia, I had the pleasure of bumping into an observation about the ClearCase at Rajeev Nagar’s book. This book, as I have never gotten tired of saying, is still the only respectable reference on Windows File System development, even though it was first published in 1997. Where is ClearCase in this story? Well, if you’re sick like me and have this book, take a peek at the beginning of chapter nine. On the first page of this chapter, you’re going to find the following passages.

    Yeah, that’s really cool! 🙂

    Back to the Classes

    For a whole month after I had come back to Brazil, I spent some time chasing the content I had lost at the university. Yeah, I’m still graduating in Computer Engineering. I have been working on my final project (Final Course Project). My project must obligatorily have a Windows driver; that is the least thing I could do. Finally, I will be able to show what I can do to my classmates. During the course, some friends had asked me what I’ve worked with, since I have often been reading big books from Microsoft. After trying to explain the simplest way possible, drawing or even using puppets, they still get with that interrogation face. Well, at the time that the blue screen shows up, they will eventually understand.

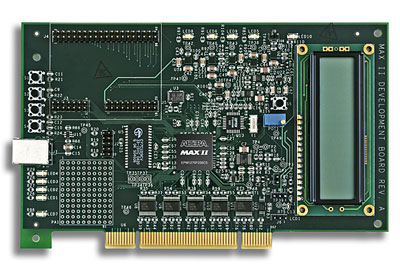
    I took the tour in the United States to buy this development kit of Altera. This kit will be part of my project and in the future, I will be able to use it in my courses on driver development. Nowadays I have just counted on the OSR training boards, as I already talked about in this post. Unlike the OSR boards, this kit may have its hardware defined by a language called VHDL, and thus, it can cause the board to have a wide variety of behaviors and be able to illustrate the driver interface construction for every situation. This card costs around R$ 1,700.00 in Brazil, while I had only paid U$ 150.00 there in USA. Practically, a candy price. Do you know, when we used to go to the bakery to buy that ice cream cone that came with a stuck toy? So, it was almost the same thing. Another interesting thing in this kit, besides its price, is the possibility of using its USB and PCI interfaces. That will be very funny.

    Portability and Performance Seminar

    In this last weekend, I also attended that event organized by Brazil C/C++ group. It’s amazing to notice how these events are bringing more and more people to it. I took some pictures, but I’ll leave the comments on behalf of my friend Slug, who has a cool post about it.

    Back to the bloggers’ world, I will try not to abandon you, guys for so long. Some excuses apart, it has not been that easy.

    CYA.

  • Step into Kernel (Vista + USB2)

    I have already mentioned into another post that it is possible to perform Kernel Debugging via a 2.0 USB port. In this post I’m going to demonstrate such a 2.0 USB connection working. Yeah, that’s a good thing. So let’s stop this idle talk and go to the business. If you know nothing about Kernel Debugging, you can read this post which brings the concepts and basic steps on the subject or you can ask yourself “How have I ever gotten into this site?” and return to ORKUT.

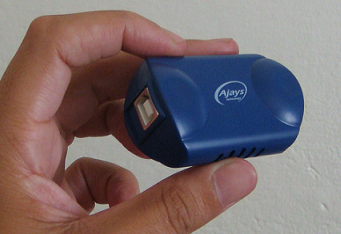
    The USB bus does not allow us to have direct connections between two computers. In order to use a USB port for this purpose, we must rely on the additional hardware helping. Although it is named as Debug Cable, this is a small device that connects computers via USB ports. I do not know if there are already other manufacturers for the Debug Cable, but the one I’m using at this experiment is NET20DC.

    Using the Debug Cable

    Using the Debug Cable is a luxury that only Windows Vista and posterior systems can enjoy. It needs to be plugged into a 2.0 USB port without going through any hub at the TARGET side. But how am I supposed to know for sure which of my ports is actually 2.0?

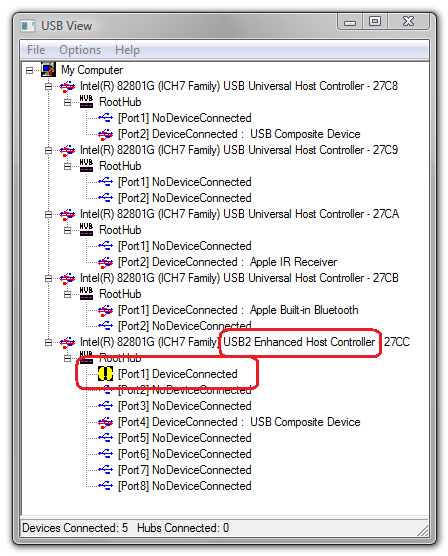
    An easy way to know that, especially for those ones who have installed WDK, is to build the USBView sample which is in the “C:\WinDDK\6000\src\usb\USBView” folder of WDK. This program lists the drivers and their respective connected USB devices. Thus, when connecting the Debug Cable to the TARGET machine, USBView should inform us what port this new device is connected to. Note that in this window we can see which controller the port we are using belongs to.

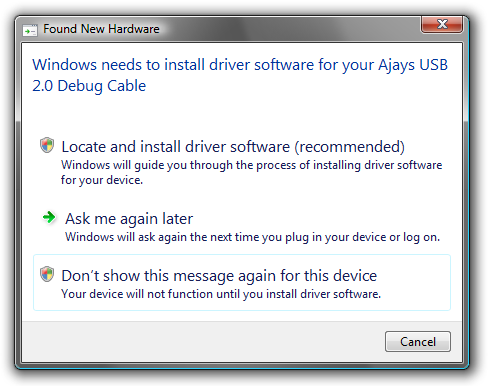
    Windows will prompt a driver when detecting this new USB device presence. No driver must be installed to use the Debug Cable on the TARGET side. So, you can select “Do not show this message again for this device” in the window shown below. Not installing any driver to the TARGET side makes sense. Remember that this interface will be used by BIOS of the TARGET machine and its control wont be passed to the operating system core. Do not forget, yet, there is another requirement to use the Debug Cable. The TARGET machine’s BIOS must implement this debug interface control. The most unfortunate part of this story is about checking whether your BIOS offers such support. All that you need to do is just to try. That means you may have the Debug Cable, a free 2.0 USB port and the cables but even that, there is a risk of not connecting it because TARGET BIOS might not support the debug interface. I’m glad to know that my laptop offers this support and have not spent this money for anything importing the Debug Cable. Phew!

    Modifying Boot.ini

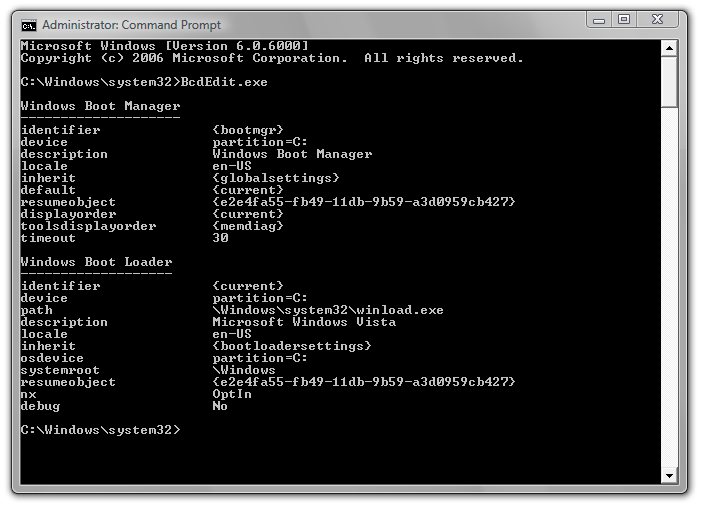
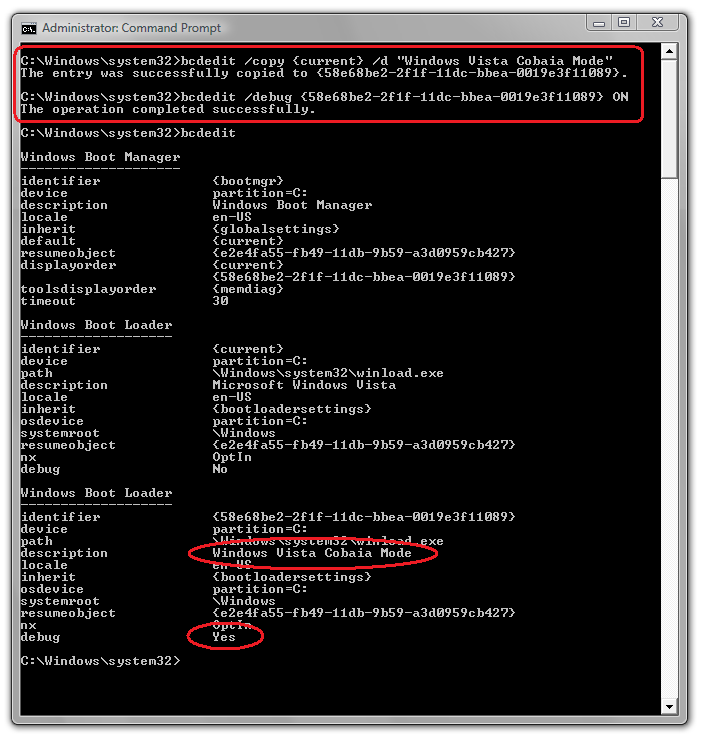
    Sorry? Boot.ini? I’m sorry to tell you that the Boot.ini has gone way. Windows Vista uses a new architecture called Boot Configuration Data (BCD). That has been the end for Boot.ini file. To edit the BCD settings, we use the BCDEdit.exe tool, a console application that needs to be run with administrative rights. Executing this tool without any parameters returns it to the following output.

    To configure the system in order to have two boot options, the one with enabled debugging and the other isn’t, follow the described steps below. The Boot Manager managers the Boot Loaders which are either possible to be the other operating systems, even prior to Windows Vista or configuration sets of the same system. Each of these items is identified by a GUID. Note that the first command makes a copy of the current configuration to the one contains the “Windows Vista Guinea Pig Mode” string as a description. In response to this copy, the tool returns a resulting GUID of the copy. Also, observe that the second command enables the kernel debugging to the setting identified by the GUID just received. Right now, if we take a look at the settings, it will have a result like the same image being displayed below.

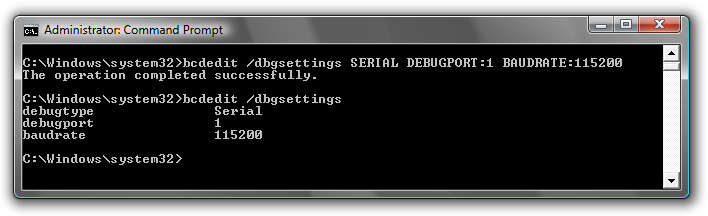
    Nice!!! Now we have to configure the media to be used by the Kernel Debugger. I believe that most systems still use serial ports for this purpose. In this case, the most common configuration is to use the COM1 serial port with a 115200 baud rate. To configure these settings, use the following command line. To see the current settings, just run the second command line as it is shown below.

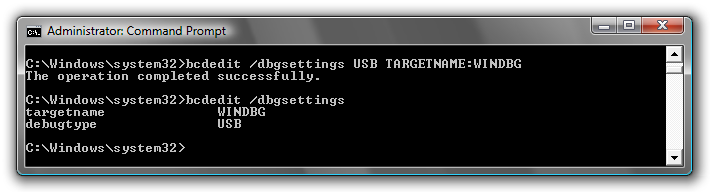
    If you do not know how to use the serial port as a communication way for the kernel debug, this is the post that talks about it. However, in this post I am commenting about kernel debug using a 2.0 USB as a communication way. In this case, the settings are described at the command line that is shown below. The TARGETNAME is able to receive any name. I have used the “WINDBG” name for obvious reasons, but you can use anyone.

    As you may have guessed, the settings on the debug mode of communication is global, that is not linked to one or another boot configuration identified by a GUID.

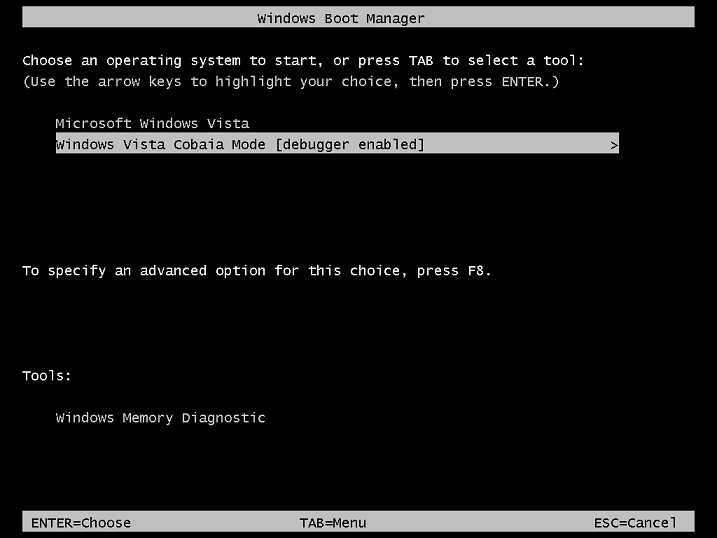
    I believe that on the TARGET side everything is ready to make the link. Thus, when you reboot the victim machine, the following menu will be displayed by the Boot Manager:

    Configuring the HOST

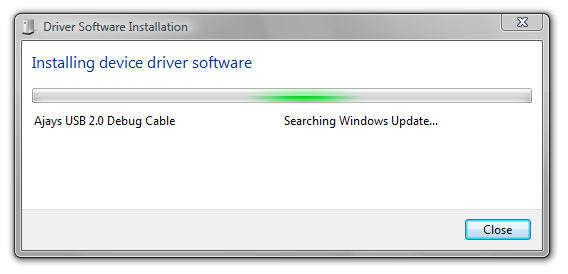
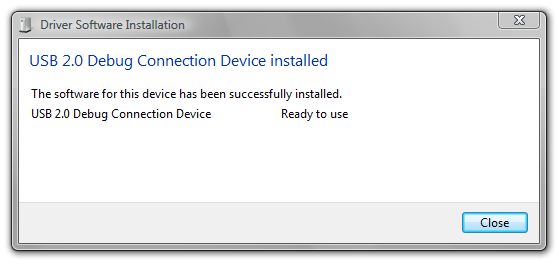
    At the HOST side of this game, we must add the driver that controls the Debug Cable to it and allow Windbg to use this device. Although I’m using Windows Vista on the HOST side, nothing would prevent me from using Windows 2000 or higher on this side of the conversation. The fun starts when you plug the device and click “Locate and install driver (recommended)” into the “New Hardware Found” window that has already appeared into this post. At this time, Windows searches for the driver at Windows Update database.

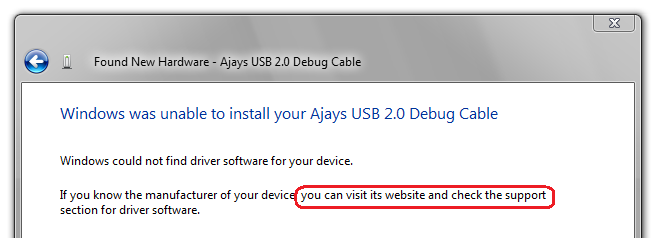
    The thing starts to get funny when Windows “asks” me to insert the disk that coming with the Debug Cable. Only two words had been on my mind at that moment, “What disk?”. Without some other options, I clicked on “I do not have that damn disk! Are you crazy? Show me anything, for the God sake.” Some of you might even have this sequence of windows decorated by just not finding drivers for all devices you have had.

    Finally, when the last window has been shown to me, a light came to me, just like one of those brilliant ideas that I have had every leap year. That’s when I thought to myself “Now I know! I am going to visit the manufacturer’s website and look for a support session.”

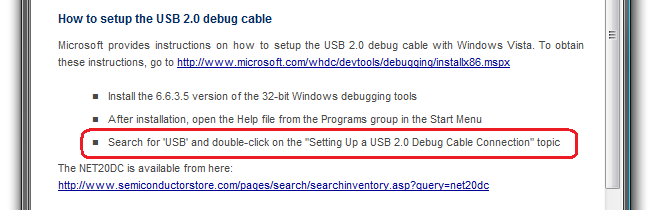
    And at the manufacturer’s web site…

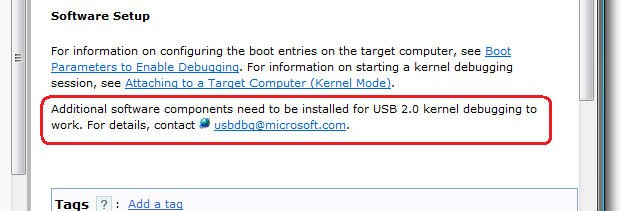
    And at the Microsoft’s web site…

    In the end, I sent this e-mail to get any sign that I had not thrown my money into the trash can. Less than an hour after, I got the answer with a list of requirements and steps to be followed; but the most important thing had just been revealed to me at the end.

    I knew I could count on Microsoft intelligence and agility to resolve this but, for those who are reading this post, my tip is: When Windows prompts for new device driver, point out the “C:\Program Files\Debugging Tools for Windows\usb” folder.

    So, I’m glag to show you this next window into the figure below:

    Configuring WinDbg

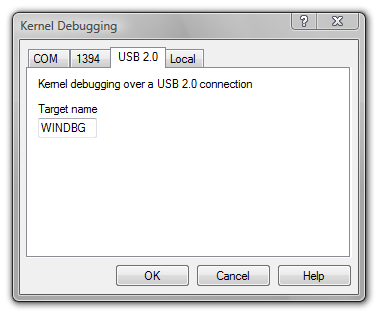
    Now it’s children’s play. Select the “Kernel Debug …” item from the “File” menu. Click on the “USB 2.0” tab and type the same TARGETNAME you have chosen at TARGET configuration with BCDEdit.exe. In my case, the name is WINDBG as it is displayed at the figure.

    Clicking OK, the WinDbg command window should display the text highlighted in red below and wait for the connect completion. The output below was obtained with a CTRL+Break after having the debugger connected.

    Microsoft (R) Windows Debugger Version 6.8.0004.0 AMD64
    Copyright (c) Microsoft Corporation. All rights reserved.
     
    Using USB2 for debugging
    Waiting to reconnect...
    USB2: Write opened
    Connected to Windows Vista 6000 x86 compatible target, ptr64 FALSE
    Kernel Debugger connection established.
    Symbol search path is: SRV*c:\websymbols*http://msdl.microsoft.com/download/symbols
    Executable search path is:
    Windows Vista Kernel Version 6000 MP (1 procs) Free x86 compatible
    Built by: 6000.16584.x86fre.vista_gdr.071023-1545
    Kernel base = 0x82000000 PsLoadedModuleList = 0x82111e10
    System Uptime: not available
    Break instruction exception - code 80000003 (first chance)
    *******************************************************************************
    *                                                                             *
    *   You are seeing this message because you pressed either                    *
    *       CTRL+C (if you run kd.exe) or,                                        *
    *       CTRL+BREAK (if you run WinDBG),                                       *
    *   on your debugger machine's keyboard.                                      *
    *                                                                             *
    *                   THIS IS NOT A BUG OR A SYSTEM CRASH                       *
    *                                                                             *
    * If you did not intend to break into the debugger, press the "g" key, then   *
    * press the "Enter" key now.  This message might immediately reappear.  If it *
    * does, press "g" and "Enter" again.                                          *
    *                                                                             *
    *******************************************************************************
    nt!RtlpBreakWithStatusInstruction:
    820818d0 cc              int     3
    0:kd>

    Now the easy part has been finished. The next steps are referring to investigate the issue, however this will be described in a future post.

    I hope having helped.
    CYA 🙂

  • DriverEntry.com.br shows up

    Hi there, I promise to you this post will be pretty short. That news is for the ones who love playing with bits and bytes.

    The Forth Programmer’s Meeting, that will be organized by the C/C++ Brazil group, will take place next March 29th.

    The event will be counting on a series of lectures with real authorities on the subject. I guess the only distinguished unknown person will be me. I have been invited to talk about driver architecture and development for Windows.

    If you have no idea how the drivers are organized and how you can build them, then this is your chance to continue not knowing it, but with a good opportunity to see other excellent talks. I have already given some training, but I cannot say I have had great experiences with lectures. I think the biggest lecture I have ever given was composed by an audience of about three people. That had included my mother, who was telling me all the time to shut up so that she could watch the soap opera.

    Anyway, I’ll try to do my best there. Fortunately, my friend Strauss, who incidentally is one of the speakers, has given me a help publishing this post with tips for speakers.

    I’ll see you there!

  • KeWaitForMultipleObjects, pero no mucho!

    A while ago, my friend Slug published a post about his adventures in Kernel looking for the reason for a blue screen. The problem was caused by an incorrect call to the KeWaitForMultipleObjects() function in an attempt to wait for 4 objects. Yeah Wanderley, that’s a result of inheriting a code from everyone. Just because the function has the word “multiple” in its name, it does not mean we can wait for that absurd amount of four objects. In this post I am giving you a simple example of how to use this feature.

    Where does the limit live?

    The KeWaitForMultipleObjects() function uses an array of elements of KWAIT_BLOCK type which contains the data referring to the multiple waiting objects being performed. In many cases, this amount of multiple waiting objects is no more than three. In order to avoid ever having to build an array of KWAIT_BLOCK structures to perform a multiple waiting, the structure that represents a thread in kernel mode, the KTHREAD, contains an array of four elements of this structure embedded in it, as it is shown below.

    kd> dt nt!_KTHREAD
       +0x000 Header           : _DISPATCHER_HEADER
       +0x010 MutantListHead   : _LIST_ENTRY
       +0x018 InitialStack     : Ptr32 Void
       +0x01c StackLimit       : Ptr32 Void
       +0x020 Teb              : Ptr32 Void
       +0x024 TlsArray         : Ptr32 Void
       +0x028 KernelStack      : Ptr32 Void
       +0x02c DebugActive      : UChar
       +0x02d State            : UChar
       +0x02e Alerted          : [2] UChar
       +0x030 Iopl             : UChar
       +0x031 NpxState         : UChar
       +0x032 Saturation       : Char
       +0x033 Priority         : Char
       +0x034 ApcState         : _KAPC_STATE
       +0x04c ContextSwitches  : Uint4B
       +0x050 IdleSwapBlock    : UChar
       +0x051 Spare0           : [3] UChar
       +0x054 WaitStatus       : Int4B
       +0x058 WaitIrql         : UChar
       +0x059 WaitMode         : Char
       +0x05a WaitNext         : UChar
       +0x05b WaitReason       : UChar
       +0x05c WaitBlockList    : Ptr32 _KWAIT_BLOCK
       +0x060 WaitListEntry    : _LIST_ENTRY
       +0x060 SwapListEntry    : _SINGLE_LIST_ENTRY
       +0x068 WaitTime         : Uint4B
       +0x06c BasePriority     : Char
       +0x06d DecrementCount   : UChar
       +0x06e PriorityDecrement : Char
       +0x06f Quantum          : Char
       +0x070 WaitBlock        : [4] _KWAIT_BLOCK
       +0x0d0 LegoData         : Ptr32 Void
       +0x0d4 KernelApcDisable : Uint4B
       +0x0d8 UserAffinity     : Uint4B
       +0x0dc SystemAffinityActive : UChar
       +0x0dd PowerState       : UChar
       +0x0de NpxIrql          : UChar
       +0x0df InitialNode      : UChar
       +0x0e0 ServiceTable     : Ptr32 Void
       +0x0e4 Queue            : Ptr32 _KQUEUE
       +0x0e8 ApcQueueLock     : Uint4B
       +0x0f0 Timer            : _KTIMER
       +0x118 QueueListEntry   : _LIST_ENTRY
       +0x120 SoftAffinity     : Uint4B
       +0x124 Affinity         : Uint4B
       +0x128 Preempted        : UChar
       +0x129 ProcessReadyQueue : UChar
       +0x12a KernelStackResident : UChar
       +0x12b NextProcessor    : UChar
       +0x12c CallbackStack    : Ptr32 Void
       +0x130 Win32Thread      : Ptr32 Void
       +0x134 TrapFrame        : Ptr32 _KTRAP_FRAME
       +0x138 ApcStatePointer  : [2] Ptr32 _KAPC_STATE
       +0x140 PreviousMode     : Char
       +0x141 EnableStackSwap  : UChar
       +0x142 LargeStack       : UChar
       +0x143 ResourceIndex    : UChar
       +0x144 KernelTime       : Uint4B
       +0x148 UserTime         : Uint4B
       +0x14c SavedApcState    : _KAPC_STATE
       +0x164 Alertable        : UChar
       +0x165 ApcStateIndex    : UChar
       +0x166 ApcQueueable     : UChar
       +0x167 AutoAlignment    : UChar
       +0x168 StackBase        : Ptr32 Void
       +0x16c SuspendApc       : _KAPC
       +0x19c SuspendSemaphore : _KSEMAPHORE
       +0x1b0 ThreadListEntry  : _LIST_ENTRY
       +0x1b8 FreezeCount      : Char
       +0x1b9 SuspendCount     : Char
       +0x1ba IdealProcessor   : UChar
       +0x1bb DisableBoost     : UChar

    From these four elements, three of them are intended to be used by KeWaitForMultipleObjects(), while the fourth one is reserved to be used by the system to implement the waiting with a timeout.

    To wait for up to three objects, the code would be as it is shown below:

        //-f--> PVOID array
        PVOID       pObjects[3];
     
        //-f--> We have to initialize a pointer array for 
        //      the objects which the waiting is based in.
        pObjects[0] = &kEvent1;
        pObjects[1] = &kEvent2;
        pObjects[2] = &kEvent3;
     
        //-f--> That's a simple call for a multiple waiting objects
        //      of 3 ones.
        nts = KeWaitForMultipleObjects(3,
                                       pObjects,
                                       WaitAll,
                                       Executive,
                                       KernelMode,
                                       FALSE,
                                       NULL,
                                       NULL);

    Does it mean we cannot wait for more than three objects each time? Well, let me explain it. When it is necessary to wait for more than three objects, we must allocate a large buffer, enough to hold an N-element array of the KWAIT_BLOCK structure, where N is less than or equal to 64. If there is more than that, we are going to have a nice MAXIMUM_WAIT_OBJECTS_EXCEEDED.

    “If a buffer is supplied, the Count parameter may not exceed MAXIMUM_WAIT_OBJECTS. If no buffer is supplied, the Count parameter may not exceed THREAD_WAIT_OBJECTS.”

    //-f--> From wdm.h
     
    #define THREAD_WAIT_OBJECTS 3       // Builtin usable wait blocks
     
    #define MAXIMUM_WAIT_OBJECTS 64     // Maximum number of wait objects

    In that case, to be able to do a multiple 10-objects waiting, we’d have the code below:

       //-f--> PVOID array
        PVOID           pObjects[10];
     
        //-f--> An additional array of KWAIT_BLOCKs
        PKWAIT_BLOCK    pWaitBlocks = NULL;
     
        //-f--> We have to initialize a pointer array for
        //      the objects which the waiting is based in.
        pObjects[0] = &kEvent1;
        pObjects[1] = &kEvent2;
        pObjects[2] = &kEvent3;
        pObjects[3] = &kEvent4;
        pObjects[4] = &kEvent5;
     
        //-f--> You may not believe it but I do know how to use loops and arrays.
        //      I need to show you that the objects don't necessarily
        //      need to be in an array; however, the pointers related
        //      to them do.
        pObjects[5] = &kEvent6;
        pObjects[6] = &kEvent7;
        pObjects[7] = &kEvent8;
        pObjects[8] = &kEvent9;
        pObjects[9] = &kEvent10;
     
        //-f--> We cannot initialize the KWAIT_BLOCKS array structures  
        //      embedded into the KTHREAD structure; we must allocate our own array.
        pWaitBlocks = (PKWAIT_BLOCK) ExAllocatePool(NonPagedPool,
                                                    sizeof(KWAIT_BLOCK) * 10);
     
        //-f--> Doing another test doesn't hurt anybody; however, try not
        //      to test a driver to see how many people die.
        ASSERT(pWaitBlocks != NULL);
     
        //-f--> A simple call to a multiple waiting for
        //      10 objects without a bugcheck.
        nts = KeWaitForMultipleObjects(10,
                                       pObjects,
                                       WaitAll,
                                       Executive,
                                       KernelMode,
                                       FALSE,
                                       NULL,
                                       pWaitBlocks);
     
        //-f--> Having memory leak is not polite.
        ExFreePool(pWaitBlocks);

    In summary, that’s all.
    Good bye!

  • OSR Seminars at Home

    If one of the problems that had prevented you from making a specialized training in developing device drivers at the OSR was a fear of flying, so there is no problem anymore. OSR, after years and years of experience teaching how to write drivers, has now invested in Webinars. This news has already been announced since last Jan. 4, but it is still surprising when I comment it with some people. So, I have done this post trying to pass it to more people at once.


    Cheaper?

    The financial advantage is in the fact of avoiding buying flying tickets and paying hosting for a week in the United States. Okay, okay, it’s that’s not you who is going to pay it, but figure out that not everyone works for multi-national companies with thousands of dollars earmarked for employee training. When I had done the training at OSR, everything was paid by the company which I used to work for; however, if I put everything on the pencil, it was approximately R$ 13,000.oo of investment to attend a seminar of U$ 2,350.00. Taking the current dollar exchange rate, it would be approximately R$ 4,143.00, or roughly, a third of the total. This may simply be the factor that is preventing you from doing the training. So, you can go running to Mommy and Daddy to say them that now they have more purchasing power for your training. But, not three times more. It seems to me Webinars are relatively more expensive than the conventional ones. The seminar I had attended lasted for 32 hours and addressed the File System Driver development (a little advanced subject), while the first webinar offered by OSR will is suppose to do a quick introduction to WDF for 20 hours for the same price.

    More Advantages

    Another very relevant point is the fact that you don’t need to leave home or the company that you work for during the seminar. Some people whom I talked to about it told me that a big problem is the fact of leaving home for a week. Some of them have small children or many other reasons you might imagine, but I think the most common reason holding a professional at work is the endless urgent bugs which can only be solved by him. Well, at least this webinar consists of 5 lessons of 4 hours. This allows you to take care of your bug collection while participating into the trainings.

    It is not only an expensive PPT

    Contrary to what one might figure out, the seminars are going to be interactive using two-way connections where the participant may, in addition to receiving all instructions live, ask questions and even receive all the printed material like in other seminars. The student is going to download the tool that establishes the connection and attend a 15-minute session to test the machine to be used in them and thus, make sure that the participant is having no problem during the training.

    And now, if your company really does not want to pay training for you, it is, at least, easier to pay it for yourself; this way you may use this as a new star on your resume.
    Goodbye!

  • CLEANUP and CLOSE

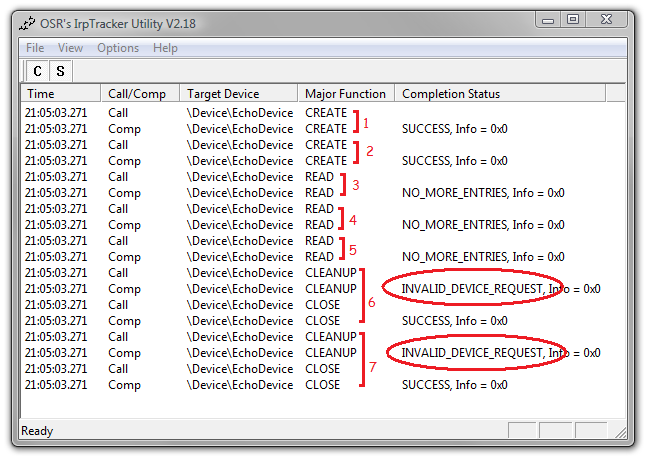
    I have written a post that describes the steps of how to create a simple driver. This driver simply keeps a list of strings it receives via writing IRPs and returns them via reading IRPs. Well, if you do not know what an IRP is, another post tries to explain what they are and even describes the needed steps to use the IRP Tracker to observe the IRPs coming and going. If we do a little test using the IRP Tracker on the sample driver that I have just commented, we will have an output similar to the figure below.


    We can see all the IRPs that our device has received from IRP_MJ_CREATE to IRP_MJ_CLOSE. Among these IRPs, we can notice that some of them were not completed successfully. Because no routine has been designed to treat IRP_MJ_CLEANUP, these IRPs are completed with STATUS_INVALID_DEVICE_REQUEST. In this post I’m going to talk a little about this IRP and how your device interacts with the processes which have obtained a handle for it.

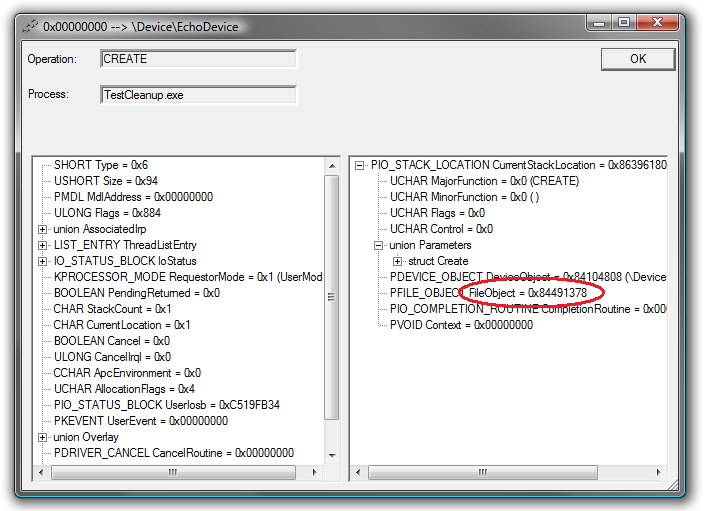
    To see the IRP details, double-click on the IRP line of the IRP Tracker so that the window below can appear. In this window you can see, among the other details, the FileObject used in the IRP. This is helping us in this post during the tests.

    When does an IRP_MJ_CLEANUP take place?

    The Object Manager sends an CLEANUP IRP in order to notify the driver that the last handle for a given FileObject has been closed. As some of you may know, when an application uses CreateFile() to get a handle to our device, this results in a FileObject creation. The subsequent operations using this handle will be linked to this FileObject. More details about this are going to be found in this post.

    A FileObject does not have a direct relation with a handle. A handle might be duplicated or even inherited from the parent process on creating a new process. The result of these actions is having multiple handles to be translated into the same FileObject. Thus, not always when an application calls the CloseHandle function, a CLEANUP or CLOSE IRP is sent to the driver.

    To follow the steps below, the sample program source code will be available for downloading at the end of this post. This program uses the example driver that have been built in another post; the driver source code can be downloaded from here. From the sources, you can compile and install the test driver. If you do not know how to do this, this post can help you. After installing the test driver, it would be interesting to execute the calls below with the help of a debugger, and thus, be able to observe the results on the IRP Tracker for ever executed line.

    It’s important to read the source comments below. I got lazy to duplicate this information here in the post.

    /****
    ***     main
    **
    **      I hope that everyone know this is the
    **      application entrypoint. Otherwise,
    **      you might be precipitaded on reading a
    **      Windows driver blog.
    */
    int main(int argc, char* argv[])
    {
        HANDLE  h1, h2, h3;
        CHAR    szBuffer[100];
        DWORD   dwBytes;
     
        //-f--> Here we are opening the first handle
        //      to our device. That is the step 1
        //      on the IRP Tracker. Check out the FileObject
        //      value so that you can compare it in
        //      future requests.
        h1 = CreateFile("\\\\.\\EchoDevice",
                        GENERIC_ALL,
                        0,
                        NULL,
                        OPEN_EXISTING,
                        0,
                        NULL);
     
        //-f--> Here we are opening the second handle
        //      to our device. That is the step 2
        //      on the IRP Tracker. Check out the FileObject
        //      value so that you can compare it in
        //      future requests.
        h2 = CreateFile("\\\\.\\EchoDevice",
                        GENERIC_ALL,
                        0,
                        NULL,
                        OPEN_EXISTING,
                        0,
                        NULL);
     
        //-f--> Here we are throwing an IRP_MJ_READ for the
        //      first FileObject we have gotten. Step 3 on
        //      IRP Tracker. Notice that the first FileObject
        //      is going to be used in this IRP.
        ReadFile(h1,
                 szBuffer,
                 sizeof(szBuffer),
                 &dwBytes,
                 NULL);
     
        //-f--> Here we are throwing an IRP_MJ_READ for the
        //      second FileObject we have gotten. Step 4 on
        //      IRP Tracker. Notice that the second FileObject
        //      is going to be used in this IRP.
        ReadFile(h2,
                 szBuffer,
                 sizeof(szBuffer),
                 &dwBytes,
                 NULL);
     
        //-f--> The handle duplication is not notified
        //      to the driver. Only Object Manager "has known"
        //      about that. There isn't any corresponding
        //      step on IRP Tracker.
        DuplicateHandle(GetCurrentProcess(),
                        h1,
                        GetCurrentProcess(),
                        &h3,
                        0,
                        FALSE,
                        DUPLICATE_SAME_ACCESS);
     
        //-f--> As the third handle was goten from the
        //      first handle duplication, the corresponding
        //      FileObject is the same as the first handle.
        //      Step 5 on IRP Tracker. Notice that the first
        //      FileObject is going to be used on this IRP.
        ReadFile(h3,
                 szBuffer,
                 sizeof(szBuffer),
                 &dwBytes,
                 NULL);
     
        //-f--> Because we have two handles for the first FileObject,
        //      closing one of them will not gererate any notification
        //      to our device. There isn't any corresponding step
        //      on IRP Tracker.
        CloseHandle(h1);
     
        //-f--> That handle has not been duplicated, thus, when it is closed,
        //      an IRP_MJ_CLEANUP followed by an IRP_MJ_CLOSE are going to be
        //      sent to the driver. Step 6 on IRP Tracker.
        CloseHandle(h2);
     
        //-f--> Closing that handle, we will have the same behavior
        //      seen during the h2 closing. From the driver
        //      viewpoint, the first FileObject will be destroyed
        //      now. Step 7 on IRP Tracker.
        CloseHandle(h3);
     
        //-f--> And they have all lived happy ever after.
        return 0;
    }

    Getting a handle to an object assures us that this object will be valid until we close this handle. An object can only be destroyed by the system after all handles to it are closed. For this, the Object Manager maintains two counters, ProcessHandleCount and SystemHandleCount. The first one keeps the amount of open handles to an object in a given process. The other one maintains the sum of all ProcessHandleCount for the object in the system. These counters are decremented as these handles are closed. When they reach zero, a IRP_MJ_CLEANUP is generated.

    Usually an IRP_MJ_CLEANUP serves us as an event to cancel any asynchronous operation on the FileObject which is being finalized. These IRPs are linked to the threads that have launched them and any asynchronous IRP should be cancelled at this time.

    But what is IRP_MJ_CLOSE used for?

    Besides the reference counters above mentioned, there is also the ObjectReferenceCount which, besides being incremented when a new handle is obtained, it is also incremented when a reference is made using kernel functions like ObReferenceObject(), for example. These calls increment the ObjectReferenceCount without a new handle being generated. For those who have known COM, this call has the similar behavior to AddRef(). This allows the object to remain valid itself for the kernel, even after all handles to it have been destroyed. Anyway, when this counter reaches zero, then the IRP_MJ_CLOSE is sent.

    A driver can associate data structures for a given FileObject using the FsContext and FsContext2 pointers according to what I had discussed in another post. These structures can only be deallocated when the driver receives the IRP_MJ_CLOSE.

    Operations after IRP_MJ_CLEANUP

    When the driver receives an IRP_MJ_CLEANUP, it does not mean that the end is near. Other kernel components can still launch new IRPs for reading or writing, even after this event. Not to mention the IRP_MJ_INTERNAL_DEVICE_CONTROL that can be exchanged among drivers.

    A very common scenario at the File Systems development is precisely about a reference to a FileObject that is maintained by the Cache Manager. Even when all handles are closed by the applications, the system still retains this refrence anticipating that some application may want to open the same file again. The Cache Manager has some system threads that perform the so-called “delayed writing”. This feature retains many writes to a file in a single operation aftermost in order to reduce the number of disk accesses, thus gaining performance. It is too often such writings taking place, once the file had all of its handles closed for applications, and then, these data being written after IRP_MJ_CLEANUP.

    In the end of it all, I hope to once again have helped more than hindered. Issues regarding the Cache Manager, Memory Manager and File Systems are not very trivial, but they are interesting enough to be read about and understand what the system has done before saying that everything is crap.

    Until next time!

    TestCleanup.zip

  • The wrist is still pulsing

    Before completing three months without any sign of life, here I am giving a peek at what has happened at the blogosphere. This year ending has been really hectic. As you may know, my employment by IBM has contributed a little to my absence. Okay, the university has also helped a lot. At the very end of the year, I reserved a time for myself and went for a walk on the beach. But let’s stop talking and get to what matters.

    In this post, back to the living world, I am going to only comment on small things and postpone for a more elaborated post later (but still in this life), like you’ve been used to seeing around here.

    Debug in Free

    One of the things I had to learn to live together at IBM was to debug the driver we were supposed to write, which had always been built in Free or with optimizations and everything else that a release building deserved. Well, I have tried reluctantly to say it would be important to have a checked version for testing and that would be valuable to run our driver with all ASSERTs turned on check anything unusual that might occur. But believe me, it is not that easy to convince people that have already being accustomed to this situation. I was looking for good reasons to have a usable checked version when I had found this post. Well, the reasons are actually quite good but I still argue that we should have a checked version . I have been preparing a post that says a little about it.

    Talking about knowing English

    At some posts before this, I had talked about MSDN translated into some languages, including Portuguese. The message was that we could deal with it a little without knowing English but, if you don’t know English and you want to develop drivers for a living, so you have to learn English as soon as possible. I remembered this post today at a Google search when a link was especially rewarding.

    IoGetDeviceObjectPointer Tips

    Well, if someone has managed to get some tips, please tell me. If one day I decide to learn a third language, now I have a candidate for it.

    New Year, New Look

    It was supposed to have happened before, but unfortunately the time is has been short for many people. I put in check brother’s web designer skills. I asked him to improve this blog layout. It’s getting pretty good, but I still have had nothing concrete to be shown. I will be migrating to WordPress soon. Most of the work has already been done but much of it has remained to be done. My main intention in migrating to WordPress is to be able to use one of these plug-ins that would allow me to have the same post in both languages, English and Portuguese. Well, we have tried to test a few of them but they got some problems. But we’ll get there.

    CYA…

  • IBM, Here we go!

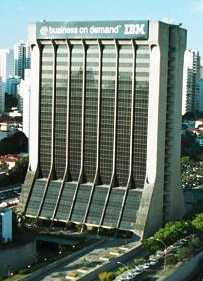
    After a few months in a long selection process, I finally can share this good news with you. Good news for me, at least. Today, October 15th, 2007 was my first day as an IBMer on the Tutoia Street building. No, I haven’t given up the Windows Kernel to program neither Java nor ABAP. The issue is the usual one, the same blue screen.

    How have you learned that?

    This is a question that several people have made me. You may not believe it but it seems that things have naturally contributed to my professional development as a Windows Kernel programmer. When I was an intern at Provectus, I started reading the book “Inside Windows NT” for just a hobby, hopeless of being able one day to work with the things addressed by that literature and after all, having the privilege of working in a hardware development company in Brazil would be like winning the lottery. Well, my internship as a C programmer was in a company that had been developing its own hardware. I was maybe lucky. When it was least expected by me, there I was programming services for Windows NT, using shared memory and even a device driver appeared for my inspection. Because of my previous skill about MFC and Win32 API, what really attracted me was the Kernel Mode development. Once more for hobby, just for pleasure, I started reading about it and I must say it was hopeless again. Yeah, that time the result came from the opposite side. I went to work at a company that used to buy and sell shares for stock exchange. I used to develop COM+ using C++ and just one year was sufficient to learn about ASP, SQL and Java to know that this was not what I had been wanting for me. Luckily, the fate took me to SCUA. I did not know they used to make drivers for Windows. It was during an interview to join to the application team that I found out that there was a drivers’ team. Anyway, guess which team I ended up in after a while? By working there, I got in contact with many professionals, books, discussion lists and especially, the opportunity to put into practice what I had learned in books. Then after, it was the time of Tempest, and with it, a chance to participate into a File System Driver Training with one of the foremost authorities on the subject. Then, a friend made me an indication for me at IBM, and after two interviews, one at the building and the other on Tutoia Street, I had a technical interview by telephone with the U.S. team; and here I am. I’d work on the MVFS for Windows development team.

    And one of the points that had excited me the most in this new venture it was the opportunity to work with highly qualified people on the subject and be able to learn much from a team that involved minimally North Americans, Indians, and that time, one more Brazilian.

    My first day at IBM was fulfilled with lectures. Initially, about the IBM history, and the other being about the various procedures that such a big company required.

    CYA…